Dienstag, 4. August 2015

Arugula Salad with Sweet Potato and Wild Rice


I seldom use arugula. There are different reasons for it. Mostly because it is harder to come by then the usual lettuce varieties. It's also more difficult to store it at home. (On Pinterest I found something that could help with that problem. You have to put some of the arugula in a small plastic bag, blow air into it until it's completely inflated, twist the bag close and secure it with a plastic clip. That way the salad should stay fresh for a few days. The drawback is that it occupies a lot of space in the fridge. I didn't have the chance to try it out yet. But there is always a next time.)
But taste definitely isn't one of the reasons it's a rare visiter in my kitchen. It has it's own distinct flavour. Even a little arugula in a simple mixed salad can give the whole dish some spice. I'm sure I will use it more often in the future.

I think this was the first time I ever used sweet potatoes. It's not an ingredient that was common in my family. And even now that I live alone, I still use most of the same ingredients that were more or less standard while I grew up. It's not that easy to change some habits, even when you're open to new things (like I actually am).
Now back to the potatoes. In combination with the arugula I quite liked them. And I think I would use them again. But more as a part of a dish, then as the actual main ingredient.

The original recipe asked for pure wild rice. I substituted it with a long grain and wild rice blend. For one it's cheaper, really wild rice costs almost three to four times as much as the blend. And personally I think it tastes a little grassy. It just would be to much.

_____________________________________________________

Arugula Salad with Sweet Potato and Wild Rice

Dressing

1/4 cup lemon juice, freshly squeezed
2 small lemons, zest
1/4 cup olive oil
1 1/2 tsp agave syrup
2 garlic cloves
1/4 tsp salt

1. Wash the lemons and dab them dry. Grate the zest of the lemons.
2. Squeeze the juice out of the lemons.
3. Peel the garlic cloves. Mince them finely.
4. Combine all the ingredients in a high slender bowl.
5. Use a blender to puree them all together.

Salad Ingredients

1/3 cup long grain and wild rice blend, raw
1 sweet potato, small
3 cups baby arugula 
1/3 cup cashew, salted
1 tbsp olive oil
1/4-1/2 tsp cayenne pepper
salt
pepper

1. Cook the rice according to package instructions. Drain it in a sieve.
2. Add a little of the prepared dressing to the rice. Mix it well together and let it cool down completely. That way the rice will absorb the flavour.
3. Pre-heat the oven to 175°C/350°F.
4. Put baking parchment on a baking sheet.
5. Peel the sweet potato. Cut it into cubes, about 1cm high. Spread the potato cubes on the baking sheet.
6. Drizzle the olive oil over the potatoes and season it with cayenne pepper, pepper and salt. Stire the potatoes until they are evenly coated with the oil and the seasoning. Afterwards evenly scatter them out on the baking sheet.
7. Roast the sweet potatoes for about 20-25 minutes. Stir them once or twice to keep them from burning.
8. Let the potatoes cool down a little.
9. Wash the arugula and dab it dry. Cut it in half, that way it will be easier to eat.

To Assemble

1. Combine the rice, the roasted sweet potaoes, the cashew and arugula in a big bowl.
2. Add the remaining dressing to the salad and toss everything together.

The salad tastes best if you serve it when the potatoes are still lukewarm.
 

Bon appétit!!

Sonntag, 26. Juli 2015

Mushroom Delight


The highlight here is clearly the mushroom sauce. When I normally cook it, it's more along the lines of fry the mushrooms with some onions, add some whipping cream and bring it to a boil. And that's not really bad considering how simple the whole process is. But it doesn't hold a candle to this sauce.
You need a lot of ingredients and it's rather time consuming. The end result is worth all of it. It's flavourful and the rosemary and thyme give it a nice pep.

I had some ideas to make ground meat muffins. But at the time I already had some other things planed. So I postponed it to a later date (like a lot of things I'm planing, there is just not enough time to cook all the dishes I have in mind).
That was around christmas time and I was visiting my family. For Christmas Eve my mom and I cooked an absoloutly delicious fish (I'm planing to do it again and sooner or later I'm going to share the recipe with you). But when there is fish my brother always needs special treatment. So we had to make an alternative for him. I used the chance to try out the ground meat muffins.
They were really great. Because they cooked in their own juice they turned out rather moist. And the top had a nice cunch to it. But... I won't do that again. The muffin pan was more or less ruined. It was already hard to get the molds mostly clean. But the top of the pan was a lost cause. Small bubbles were burned into the metal.
It's so sad. You have to weigh out what you want more, a delicious meat muffin or a whole muffin pan. I chose the pan. I have to think of the future. Of all the muffins and cupcakes I still plan to make in my muffin pans.

As an alternative for the muffins I made meat balls in a casserole dish. That way the balls would also cook in their on juices. It's not as good as the muffins, but it's close.
I have the recipe for the mushroom filling from my mom. It's kind of a common fillin for her meat loaf.

_____________________________________________________


Mushroom Delight

Meat

500 g ground meat, pork
1 big onion
2 garlic cloves
1 potato
1/3 cup milk
1/8 cup water
2 tbsp mayonnaise
salt
pepper

1. Peel the garlic. Mince it afterwards.
2. Peel the onion. Use a grater to make a puree out of it.
3. Peel the potato. Use a grater to make a puree out of it.
4. Put the ground meat into a big bowl. Add the onion, the garlic, the potato and the mayonnaise. Gradually add the water and milk. Combine everything with your hands. The mass should not be to watery or it won't hold when you later form the meat balls.
5. Season with salt and pepper.

Filling

1 onion
150 g mushrooms, jar
salt
olive oil

1. Peel the onion. Cut it into fine cubes.
2. Use a colander to drain the water out of the jar. Rinse the mushrooms with cold water.
3. Cut the mushrooms into fine cubes.
4. Heat some oil in a frying pan.
5. Add the mushrooms and onions into the pan. Fry everything until the onions turn translucent.
6. Season with salt.

To Assemble

1. Pre-heat the oven to 200°C/390°F.
2. Grease a casserole dish. It shouldn't be to big, just enough place that the meat balls won't touch.
3. Take a small handful of the prepared meat. Hold it in your hand and press it flat.
4. Put about a tabelspoon full of the mushroom mixture into the middle of the patty. Form a ball around the mushrooms.
5. Place the formed ball into the prepared casserole dish. The meat balls shouldn't touch.
6. Bake for about 60-70 minutes.

Sauce

500 g pasta
1 cup reserved pasta water

3 tbsp olive oil
400 g mushrooms, fresh
2 tsp rosemary, dry
1 tsp thyme, dry
1 pinch red pepper flakes
1 tsp soy sauce
salt
pepper

2 tbsp butter
3 garlic cloves
1 onion
3 tbsp flour
4 tbsp white wine, dry
1 1/2 cups milk
salt
pepper

1. Cook the pasta according to package instructions. Reserve 1 cup of the cooking water for later use.
2. Clean the mushrooms. Cut them into thin slices.
3. Peel the garlic. Mince them afterwards.
4. Peel the onion. Cut it into fine cubes.
5. Heat 2 tbsp oil in a large frying pan.
6. Add the mushrooms to the pan. Fry them for about 10 minutes, the mushrooms should turn brown.
7. Add the rosemary, the thyme and the red pepper flakes. Fry along for another minute.
8. Add the soy sauce and season with salt and pepper. Fry along for 3 more minutes.
9. Take the mushrooms out of the pan.
10. Use the same frying pan to melt the butter with the remaining 1 tbsp olive oil.
11. As soon as the butter is completely melted add the garlic and onion to it.
12. Fry them for 5-7 minutes.
13. Add the flour and mix it for about 2 minutes. If the mixture is to dry add 1-2 tsp olive oil.
14. Stir constantly while you add the wine.
15. Add the milk. Stir it until the sauce thickens.
16. Add the fried mushrooms.
17. Use the pasta water to thin down the sauce. Add more or less of it depending on how thick you prefare your sauce.
18. Season with salt and pepper.

Serve the pasta with the sauce and the stuffed meatballs.


Bon appétit!!

Montag, 20. Juli 2015

Cauliflower Steak with Couscous

 
This dish tastes like Orient. Or at least the cauliflower steak does. All these spices make it pretty intense.
The couscous is rather bland but in combination with the sauce it's just right for this dish. I actually liked the couscous this way, with the onions and garlic. It just needs a little more pep. Adding some salt would already make a huge difference here. And then the couscous would be a great side dish for other recipes. And not only for oriental ones.

This is a great method to prepare cauliflower. Only to cut them as steaks is pretty impractical. I mean it looks rather attractive. It's just that you can only get 2 steaks out of one whole cauliflower. If you plan a nice dinner for two, go ahead and make the steaks. But if you are preparing a meal for 3 or more people, cut the cauliflower into bigger florets, spread them on the baking sheet and bake them all at ones. Of course you have to adjust the amount of spices, but that shouldn't be a problem.

You can of course use other spice blends. When I was visiting my parents, we grilled some shashlik. I made some cauliflowers as a side dish. Me and my mom just mixed together all the different spices she's got at home. Our spice blend tasted pretty italian. It all went into a big bowl, a lid on top. And than just shake, shake, shake!

_____________________________________________________


Cauliflower Steak with Couscous

Cauliflower Steak

1 small cauliflower
1 tbsp olive oil
3/4 tsp coriander, dry
1/2 tsp ground cumin
1/4 tsp ground cinnamon
1/2 tsp salt
1/4 tsp pepper

1. Pre-heat the oven to 230°C/450°F.
2. Place baking parchment on a baking sheet.
3. Cut the of the leaves from the cauliflower.
4. Cut off the bottom evenly, so it can stand on it.
5. Cut the cauliflower in half.
6. Cut a 1,5cm thick steak from each half. The remaining florets are superfluous and can be used for something else.
7. In a small bowl mix together the oil, the coriander, the cumin, the cinnamon, the salt and the pepper.
8. Place the steaks on the prepared baking sheets.
9. Pour the spice blend on the steaks and use your fingers to spread it evenly on both sides.
10. Bake them for about 20 minutes. After the first 10 minutes turn the steaks around.

Couscous

1 cup couscous
1 onion
2 garlic cloves
1 tbsp olive oil
1 cup water

1. Peel the onion. Slice it into half moons.
2. Peel the garlic. Mince the cloves.
3. Heat the oil in a sauce pan on medium-low heat.
4. Add the onions and fry them until they turn translucent.
5. Add the garlic and fry for another 30 seconds.
6. Add the water and bring it to a boil.
7. Add the couscous. Stir it in and then take the sauce pan of the stove.
8. Put a lid on the pan. Leave the couscous for 8 minutes or until the water is absorbed.
9. Carefully fluff it with a fork.

Lemon Tahini Sauce

1/3 tbsp lemon juice, freshly squeezed
2 tbsp tahini
2 tbsp sour cream
1 tbsp water
salt

1. Use a fork to blend all the ingredients together in a small bowl.


Bon appétit!!

Samstag, 11. Juli 2015

Black and White Raspberry Cake


I created this cake for the birthday of a friend. But then I got sick and couldn't make it. I was pretty sorry about it. But since I already planed it out I thought it would be a pity not to bake it anyway. As it happens my dads birthday was the following weekend. So I got my chance.

I think of all the cakes I made in the last few years this is my favorite. At least considering the taste. I mean the combination of dark chocolate and raspberrys is always delicious.
The Frosting is absolutely mouth-watering. The taste of chocolate is quite rich and intense. Even the texture is perfect for coating a cake. YAY!


I wanted the flower to be a certain turquoise shade. It's not that easy to accomplish. To get closer to that shade, I had to use a lot of gel colour. As a result the gum paste became to sticky. To counteract that I had to use more cornstarch while I rolled it out. Thats why the flower has this light white coating. It's a pity.
I planned for the flower to be a little more fluffy. But the fondant was too damp and it softened the gum paste petals. They all just deflated. I was pretty disappointed.

_____________________________________________________


Black and White Raspberry Cake

Shortcrust

85 g butter, room temperature
1/4 cup sugar
2/3 cup flour
1 tsp vanilla extract
8 g vanilla sugar
1/8 tsp salt

1. Pre-heat the oven to 180°C/360°F.
2. Beat the butter, the vanilla sugar and the sugar with a hand mixer until it's pale and creamy.
3. Add the flour, the vanilla extract and the salt. Mix it in with a dough hook.
4. Take a baking pan but leave out the bottom.
5. Put baking parchment on a baking sheet. Place the ring of the baking pan on top. Crush the edges of the parchment around the ring.
6. Spread the dough evenly in the prepared baking pan.
7. Bake it for 15 minutes.
8. Put the baking pan on a cooling rack and let it cool down to room temperature.

Biscuit

150 g flour
38 g cornstarch
188 g sugar
315 g eggs (with shell)
1 pinch citric acid powder

1. Weigh the eggs with the shell. Try to come as close to the intended weight as you can. That works best with a mix of medium and large sized eggs.
2. Separate the egg whites from the yolks.
3. Put the egg whites in a tupperware container, close it. Put the container in the freezer. Leave it there until the egg whites are a little bit frozen on the edges. This can take from 15-50 minutes. You should check every 5-10 minutes.
4. Beat the egg yolks with a hand mixer until they turn pale. Put a piece of saran wrap directly on the beaten yolk. Put the bowl in the fridge for later.
5. Mix the flour with the cornstarch. Sieve the mixture at least twice. Leave the flour in the sieve for later.
6. Put the sugar into a small bowl and leave it for later.
7. Take the baking pan with the baked shortcrust and put a cake-strip around it. Put it back on the baking sheet.
8. Pre-heat the oven to 155°C/310°F.
9. Prepare the flour, the sugar, the yolk and a timer for easy access.
12. Put the citric acid powder in a big bowl.
13. Add the egg whites.
14. Whip the egg whites manually. Preferably use a spiral whisk or a normal whisk, if you don't have one. It's important that you don't turn the bowl while you whip the eggs and you always have to beat in the same direction. Basically you have to repeat one hand movement the whole time.
15. After 10 minutes start gradually adding the sugar. Overall the egg whites should be whipped for 25 minutes.
16. Afterwards add the egg yolk.
17. Sieve half of the flour to the whipped egg whites. Fold them in carefully but quickly. Sieve in the remaining flour and fold it in too. Like with the egg whites you should not turn the bowl and fold in the same direction. Try to work quickly but always be careful.
18. Put the batter over the shortcrust. Smooth out the top as good as you can.
19. Bake for 50-60 minutes. When you press the top carefully with a finger and it jumps back, the biscuit is finished.
20. Put the baking pan on a cooling rack and leave it to cool down completely.
21. Remove the parchment. Afterwards use a thin knife to carefully cut the biscuit out of the pan.

Chocolate Batter

85 g butter, room temperature
1/6 cup cacao
1/8 cup water, boiling
1/2 cup sugar
8 g vanilla sugar
1 egg
3/4 cup flour
1/2 tbsp cornstarch
1/4 tsp baking soda
1/8 tsp salt
1/4 cup milk

1. Sift the cocoa powder and whisk in the boiling water.
2. Beat the egg lightly.
3. Combine the flour, the cornstarch, the baking soda and salt. Sift it all together.
4. Cream the butter with a hand mixer until it's light and fluffy.
5. Gradually beat in the sugar and vanilla sugar. Beat it for about 3-4 minutes, scrap the batter twice from the sides of the bowl.
6. Gradually add the egg and mix it well.
7. Add the milk to the cocoa and mix it.
8. Add the flour and cocoa mixture alternately to the batter. Start and finish with the flour.
9. Pre-heat the oven to 180°C/360°F.
10. Grease the baking pan and dust it with cocoa powder. If you want to use a Cake strip, put it on the baking pan.
11. Bake the cake for ca. 30-35 minutes.
12. Put the baking pan on a cooling rack for about 10 minutes. Afterwards take the cake out of the pan and leave it to cool on a cooling rack.


Chocolate Frosting

2 cups powdered sugar
1/4 cup cacao
190 g cream cheese
180 g butter, room temperature
280 g bittersweet chocolate
3/4 cup crème fraîche
2 pinches salt

1. Combine the sugar, the cacao and the salt in a bowl. Sift them together.
2. Use a hand mixer to beat the butter until it's creamy.
3. Add the cream chesse to the butter. Mix them together.
4. Set the mixer on slow and add the sugar-cacao mix.
5. Melt the chocolate. Let it cool down a little.
6. Add the chocolate and mix it in. Still on a slow setting.
7. Add the crème fraîche. Mix it in.

To Assemble

1-2 cups raspberrys
Raspberry jam

1. At the top of the biscuit cut of about one third.
2. Take it of and place it on a cutting board. Cut out a circle. Leave a 2cm rim. The cut out middle is superfluous and can be eaten as a snack.
3. Spread some jam on the cut surface of the bigger biscuit.
4. Place the cut ring back on the biscuit.
5. Wash the raspberrys. Carefully dab them dry.
6. Fill the cut out middle with the raspberrys.
7. Spread some of the chocolate frosting onto the biscuit. At this point it's better if the frosting is rather soft, so don't put it in the fridge beforehand.
8. Place the chocolate base on top.
9. Cover the whole cake with chocolate frosting. If the frosting is too soft. Put it in the fridge, check about every 5 minutes, until it reaches the desired consistency.
10. Covering the cake with fondont is optional.


Bon appétit!!

Sonntag, 28. Juni 2015

Spaghetti Nests


I don't really remember how I stumbled over these recipe. I think I was looking for something specific on pinterest. I liked it the moment I saw the picture. The nests look flashy but the ingredients are still simple. Recipes like that are my favorites.
I think they would work great as appetizers.


_____________________________________________________


Spaghetti Nests

200 g spaghetti
125 g mozzarella
1/2 bunch basil
2 eggs
150 g cream cheese
8-10 cherry tomatoes
salt
pepper

1. Grate the mozzarella.
2. Cut the basil into fine stripes.
3. Cook the spaghetti.
4. Pre-heat the oven to 200°C/390°F.
5. Put baking parchment on a baking sheet.
6. Whisk the eggs with a fork. Add the cream cheese and mix it in.
7. Add the basil and about half of the mozzarella.
8. Season heavily with salt and pepper.
9. Twist the spaghetti to nests on the baking sheet. Make about 5-6 nests.
10. Use a spoon to distribute the cream cheese mix between the nests. Pour the mixture into the middle of the nests.
11. Wash and dry the tomatoes. Cut them in half.
12. Scatter the rest of the mozzarella over the nests.
13. Put 3 tomatoe halves each in the middle of the nests, cut side down.
14. Bake them for 15 minutes.

Bon appétit!!

Freitag, 26. Juni 2015

Kiwi-Coconut Cupcakes


It's been a while since I last made sweet muffins. At the moment I don't really remember why I chose this recipe. I think it was because of the coconut. I have a vague memory of wanting to try out whipping coconut milk as a substitute for whipped cream. Well obviously I didn't actually do that.

This muffins gave me a chance to try out my homemade lime extract. I liked them. They were just a touch too simple for me. When or if I make them ever again I really have to pimp them up a little. Maybe some kind of filling or core or even a different topping. We will see.

_____________________________________________________


Kiwi-Coconut Cupcakes

2 cups flour
1/2 cup sugar
1/2 cup desiccated coconut
90 g butter
1 cup buttermilk
1 egg
2 tsp lime zest
2 tsp lime extract
3 tsp baking powder
1 tsp salt
3 kiwi

1. Grate the zest of the lime.
2. Combine in a big bowl the flour, the sugar, the coconut, the baking powder, the salt and the lime zest with a spatula. Form a well in the middle.
3. Melt the butter.
4. Use a whisk to mix the butter, the buttermilk, the egg and the lime extract in a bowl.
5. Peel the kiwi and cut it into thin slices. Leave it for later.
6. Pre-heat the oven to 200°C/390°F.
7. Put paper muffin liners into the molds of the muffin pan.
8. Pour the wet ingredients into the formed well. Use the spatula to combine everything.
9. Distribute the batter between the muffin liners.
10. Place one or two of the kiwis on top of the batter.
11. Bake the muffins for 20-25 minutes.
12. Take the muffins out of the pan and let them cool down on a cooling rack.


Bon appétit!!

Samstag, 30. Mai 2015

Melted Tomatoe Soup


This soup has a really strong flavor thanks to the parsley. I can guarantee that you have never tried something like this. And it's sooooo simple.
I made it for my family. They loved it (but they love most of the dishes I make for them). Me and my mom found a few points in the recipe we could change. Another time I made it (the improved recipe of course) for a friend. She was pretty delighted too.


This is one of the dishes where the recipe is rather flexible, at least in my opinion. You like your soups with a lot of broth, then don't be afraid to add more of the vegetable broth. If you prefer your soup with more bite, then only add 2 or 3 cups of broth. If you have different kinds of small tomatoes, use them.
Don't be shy to experiment here. It may taste different each time, but it will always be tasty.


_____________________________________________________


Melted Tomatoe Soup

ca. 600 g cherry tomatoes
2 onions
2 garlic cloves
1 bunch of parsley
2 tbsp olive oil
3-4 cups vegetable broth
salt
pepper

1. Peel the garlic. Mince it.
2. Peel the onions. Cut them in half. Divide the halves into three and afterwards slice them finely.
3. Heat the oil in a big sauce pan.
4. Add the onions and garlic to the pan. Braise them lightly.
5. Wash the tomatoes. Put them into the sauce pan.
6. Add the vegetable broth to deglaze.
7. Cover the pan and let the soup simmer for about 10 minutes.
8. Wash the parsley and dab it dry.
9. Take the whole parsley bunch and chop it coarsely. When all the leaves are cut, discard the remaining stalks.
10. Take the sauce pan of the stove.
11. Add the parsley to the tomatoes and stir it in.
12. Season with salt and pepper.
13. Cover the pan again and leave it for about 5 minutes.


Bon appétit!!

Sonntag, 24. Mai 2015

Raspberry-Lemon Biskuit Cake


I made this cake for my grandmas birthday. I had this idea about combining lemon and raspberry in a cake. If you look at most of my cakes I think it becomes obvious that I absolutely love my aunt's biscuit. So I used it as the base. And for the raspberry part I chose the raspberry dough from this recipe. And to round it out I would make a lemon frosting.
It didn't work out as I planed. I hate buttercream frosting, so I chose a cream cheese frosting. It was the first time I made that recipe. It was horrible. For one it was too sweet, but I could have lived with that. But the real problem was that it was too runny and it didn't get better when I put it in the fridge for some time. It just run down the cake. I would have made some other cream, but there was no cream cheese leftover. And it was already too late to go and by more. I was really pissed.
So I think it's no surprise that I'm replacing the frosting with one I made before and that actually worked and tasted good.


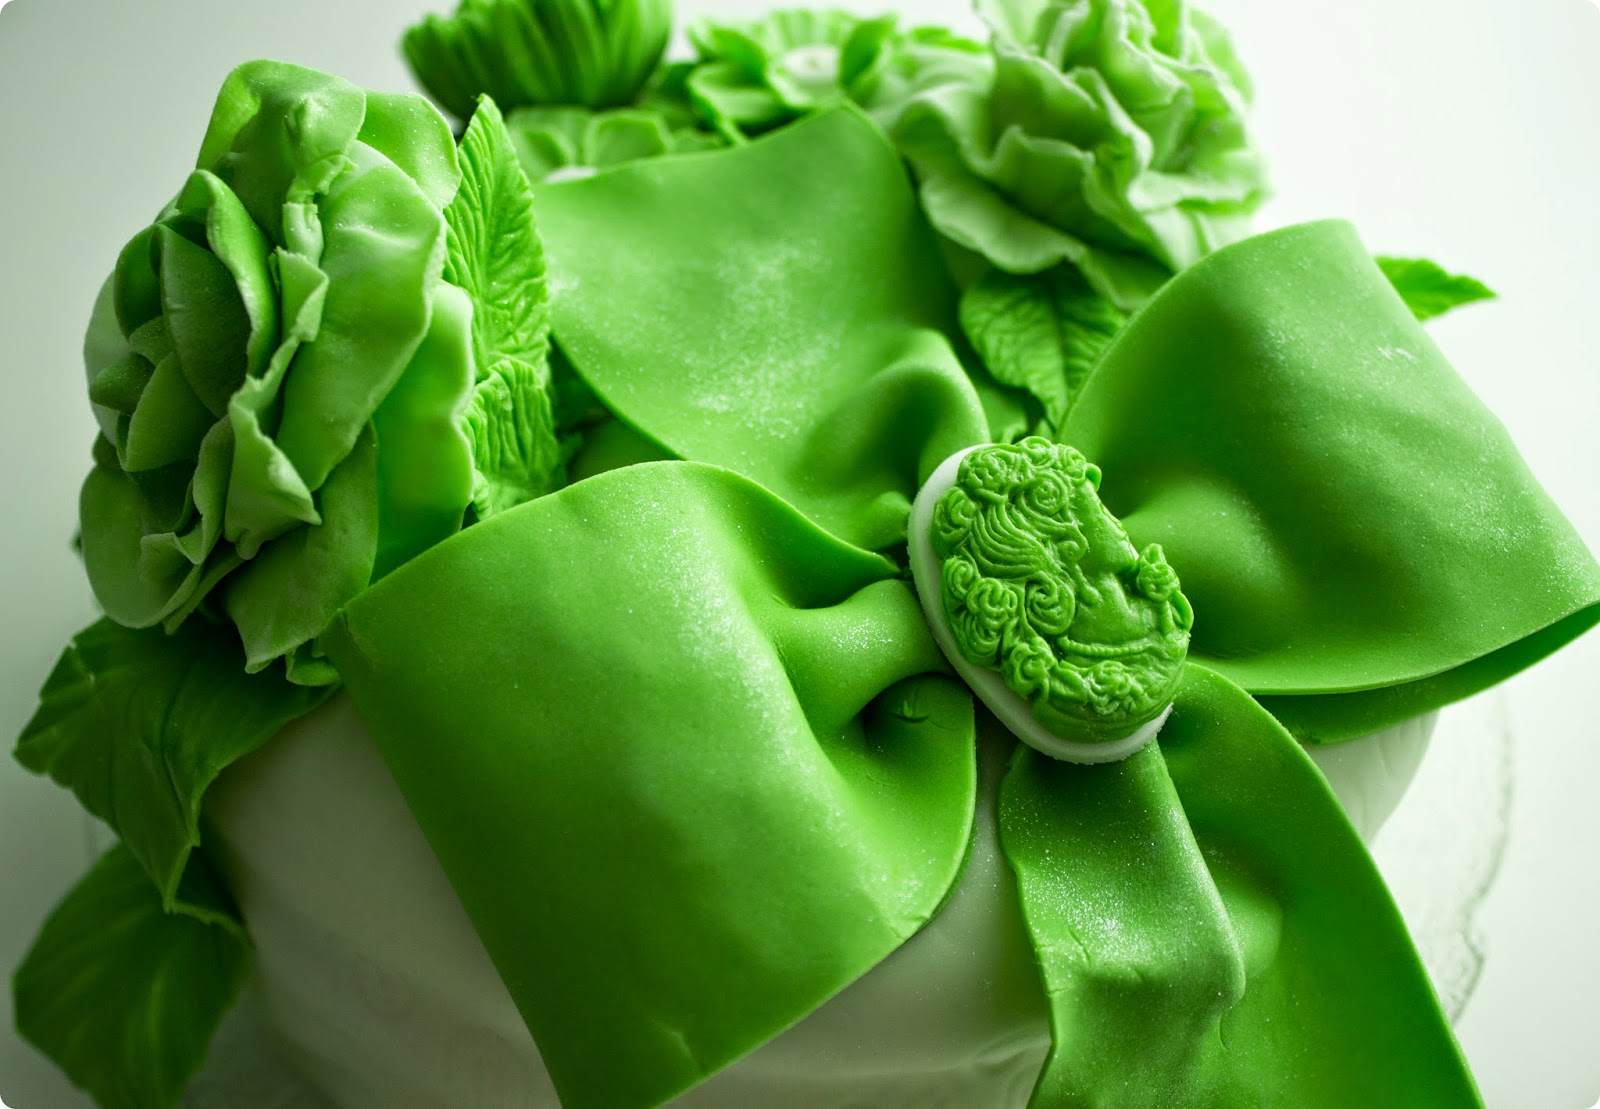
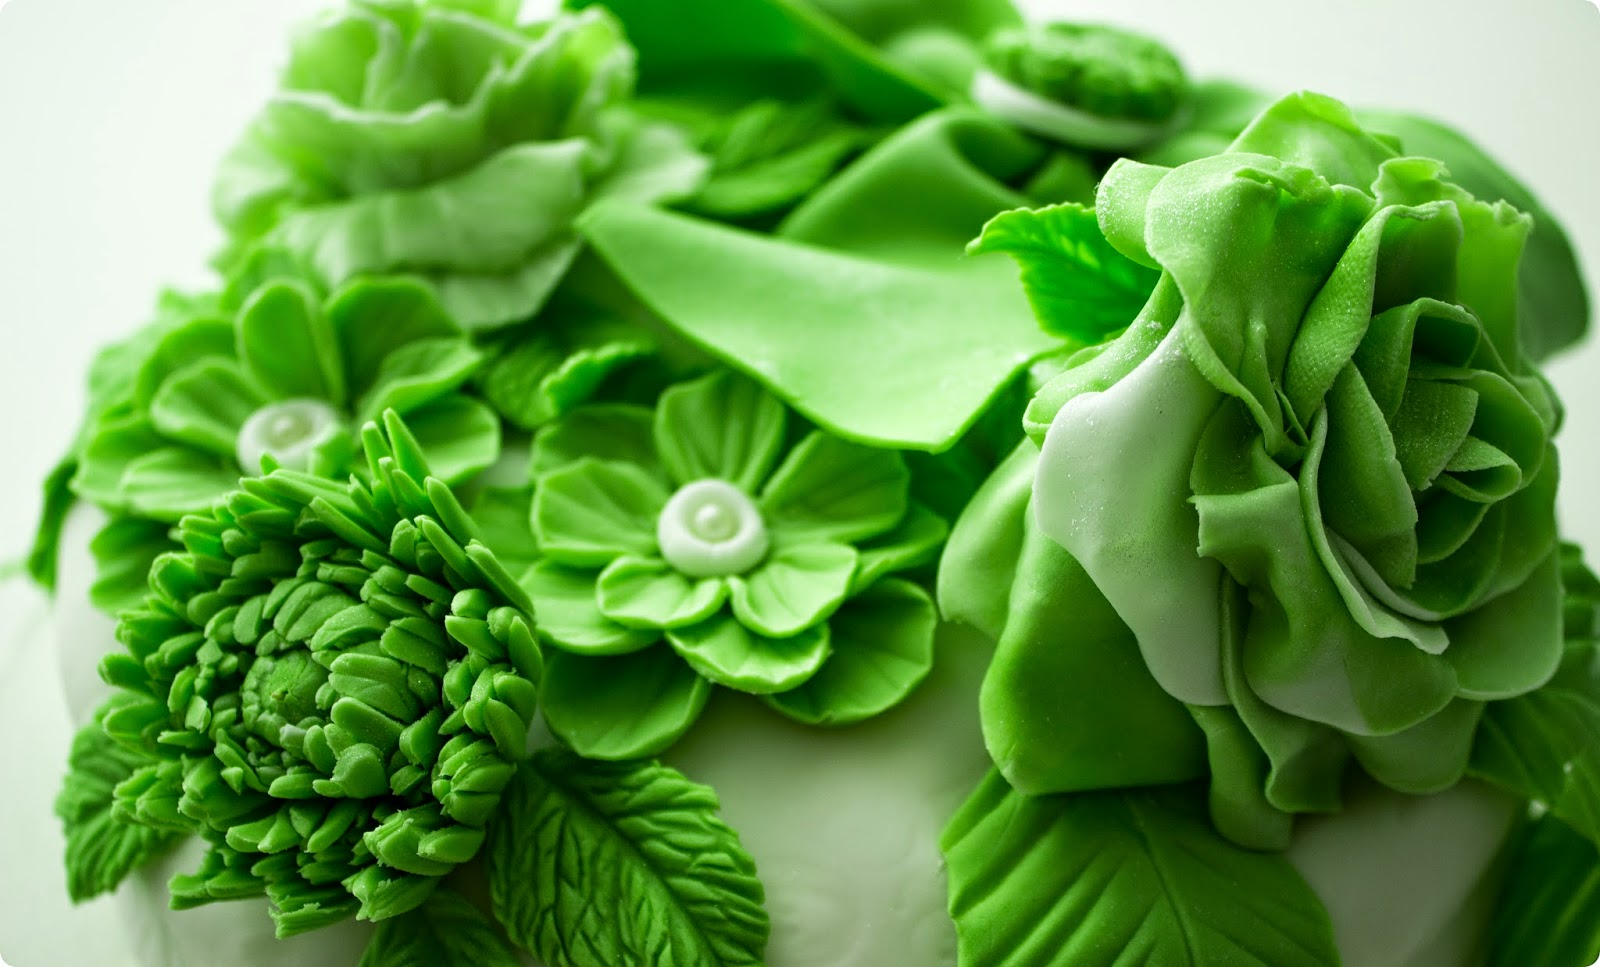
But it was not all bad. This is the first time that the fondant I made worked out perfectly.
I stumbled over this blog. There I found not only a recipe for fondant that uses only german ingredients. But also one for gum paste. I actually had to make a half an hour long bus trip to a bigger grocery store to get some of the ingredients. But it was worth it, 'couse it was still cheaper than to buy it online.
And like I said the fondant was great, just the right texture. The cake would have been beautiful. Smooth and even. The cream totally ruind it. I was kinda sad.


There are a few drawbacks to this recipe.
For one the syrup used for it is too dark. It results in an off-white fondant. For another it's a little too soft. So I don't think it's suitable for shaping.
If you make the gum paste, the problem with the shaping disappears. But if you don't plan to color it you get another problem. Because the gum paste is a pure white. The differene between the fondant and the gum paste will be obvious. 


It was the first time I worked with gum paste. I'm pretty happy with the result.
The flowers look really beautiful. They weren't perfect but for a first try still pretty good. But the work is rather elaborate. The gum paste dries fast. So I could only work on one or two petals at a time. And everytime you have to take the gum paste out of the plastic wrap, cut of a piece, put the rest back, roll out the cut of piece, stamp out the petals, put the spare gum paste back, work on the pestals and then do it all over again. I think I worked over one hour on the rose alone.
But the result was worth it.


Usually I don't put up so many picutres. But well I am rather proud of my accomplishment and wanted to show it from all sides. It would have been too hard to chose only two or even three pictures.


_____________________________________________________


Raspberry-Lemon Biskuit Cake

Biskuit

150 g flour
38 g cornstarch
188 g sugar
315 g eggs (with shell)
1 pinch citric acid powder

1. Weigh the eggs with the shell. Try to come as close to the intended weight as you can. That works best with a mix of medium and large sized eggs.
2. Separate the egg whites from the yolks.
3. Put the egg whites in a tupperware container, close it. Put the container in the freezer. Leave it there until the egg whites are a little bit frozen on the edges. This can take from 15-50 minutes. You should check every 5-10 minutes.
4. Beat the egg yolks with a hand mixer until they turn pale. Put a piece of saran wrap directly on the beaten yolk. Put the bowl in the fridge for later.
5. Mix the flour with the cornstarch. Sieve the mixture at least twice. Leave the flour in the sieve for later.
6. Put the sugar into a small bowl and leave it for later.
7. Take a baking pan but leave out the bottom. Put a cake-strip around the pan.
8. Put baking parchment on a baking sheet. Place the ring of the baking pan on top. Crush the edges of the parchment around the ring.
9. Pre-heat the oven to 155°C/310°F.
10. Prepare the flour, the sugar, the yolk and a timer for easy access.
11. Put the citric acid powder in a big bowl.
12. Add the egg whites.
13. Whip the egg whites manually. Preferably use a spiral whisk or a normal whisk, if you don't have one. It's important that you don't turn the bowl while you whip the eggs and you always have to beat in the same direction. Basically you have to repeat one hand movement the whole time.
14. After 10 minutes start gradually adding the sugar. Overall the egg whites should be whipped for 25 minutes.
15. Afterwards add the egg yolk.
16. Sieve half of the flour to the whipped egg whites. Fold them in carefully but quickly. Sieve in the remaining flour and fold it in too. Like with the egg whites you should not turn the bowl and fold in the same direction. Try to work quickly but always be careful.
17. Put the batter into the prepared pan. Smooth out the top as good as you can.
18. Bake for 50-60 minutes. When you press the top carefully with a finger and it jumps back, the biscuit is finished.
19. Put the baking pan on a cooling rack and leave it to cool down completely.
20. Remove the parchment. Afterwards use a thin knife to carefully cut the biscuit out of the pan.
 

Raspberry Batter

1 2/3 cups raspberrys, frozen
2/3 cup sugar
1/2 cup lemon juice, freshly squeezed
2 tbsp lemon zest
2 egg whites
1 egg
1/2 cup flour
1/8 tsp salt

1. Let the raspberrys thaw.
2. Press them through a sieve.
3. Grate the zest of the lemon.
4. Squeeze out the juice.
5. Pre-heat the oven to 180°C/360°F.
6. Place baking parchement into the cake pan. Press it firmly to the edges. Try to make it as smooth as possible.
7. Combine all ingredients in a bowl and whisk them together.
8. Pour the batter into the cake pan.
9. Bake it for 30-35 minutes.
10. Take the pan out of the oven and let it cool down on a cooling rack.
11. When the dough is completely cold, take it out of the pan. Don't yet detach the parchment.
12. Place it in the fridge for at least 3-4 hours.

Lemon Sauce

1/2 cup lemon juice, freshly squeezed
1/4 tsp lemon zest
1 cup sugar
3 egg yolks
3 eggs
1 pinch salt

1. Grate the zest of the lemon.
2. Squeeze out the juice.
3. In a sauce pan combine the juice, the sugar, the egg yolk, the eggs and the salt.
4. On a waterbath bring the mixture to a boil. Stir constantly with a whisk. Cook it for 12-14 minutes.
5. Press the mixture through a fine sieve.
6. Add the lemon zest and mix it in.

Frosting 

250 g cream cheese
60 g butter, soft
1/2 cup icing sugar
1 1/2 tsp lemon extract

1. Whip the butter with a hand mixer until it's smooth.
2. Add the cream cheese and 1/4 of the icing sugar to the butter. Blend everything together with the hand mixer on medium speed.
3. While the hand mixer is still running add the remaining sugar and the extract.
4. Blend the frosting for another 4 minutes.

To Assemble

1. Cut the biscuit in half. Put the top half to the side for later.
2. Spread a little more than half of the lemon sauce on the biscuit.
3. Take the raspberry batter out of the fridge. Carefully detach the baking parchment from it.
4. Place it on the biscuit.
5. Spread about half of the remaining lemon sauce on it.
6. Place the cut of biscuit on top.
7. Spread the remainig lemon sauce on top.
8. Cover the whole cake with the frosting.
9. Decorating the cake with fondant is optional.


Bon appétit!!

Dienstag, 5. Mai 2015

Lemon Ginger Honey Tea


This april it's really warm. The sun is shining! The birds are singing! The flowers are blossoming! And I managed to catch a cold. Well done Julia!

All in all it's not that bad. The worst is the sore throat. Especially in the mornings. And this is where this sweet little elixir comes in. Sadly it's not a cure, but it does soothe the throat. And tastes great while doing it.

I'm not going to give you fixed quantities in this recipe. For one it's so simple that it's really not necessary. And for another you can mix it to your taste. Add more ginger if you want it spicier, more lemon for a sour tea and more of the honey if you have a sweet tooth.
By rule of thumb just use about the same amount of ginger and lemon and add the honey until all the gaps are filled.

I would recommend a stronger, darker honey. You wont be able to taste a more subtle honey, like acacia. If you have an older honey that's already crystallized, use it. It takes a little longer but it will dissolve after about a day in the mixture.

The only drawback here is that, if you consider the amount of ingredients that go in, you only get out a small volume of the actual tea. But it's still worth it.
When (not if, cause really there is no if) you decide, that you love this. You'll want to make more. But if you make so much, that it lasts for more than three days. You should sieve out the lemon and ginger pieces. The juice will keep for another two or three days in the fridge.

_____________________________________________________

Lemon Ginger Honey Tea

Ginger
Lemon (organic)
Honey
Jar

1. Peel the ginger. Cut it into thin slices.
2. Peel of the zest of the lemons. With organic lemons you can leave the zest. Just wash them beforehand with hot water and dab them dry.
3. Cut the lemons into thick slices. Quarter the slices.
4. Layer the honey, the ginger and the lemon. Make a few thin layers.
5. You should add enough honey to fill the gaps.
6. Place the jar in the fridge. Shake it every few hours.
7. The tea is ready after about a day or after the honey is dissolved.
8. Use a spoon to mash the lemons a little to squeeze out more the juice.
9. Pour one or two tablespoons into a tea cup. Fill it with hot water.
10. Enjoy!


Bon appétit!!